
Fool-proof pie crust
Pie crusts can be a little touchy. Nothing will ruin a pie more than a botched crust. Lucky for me, my grandma taught my mom, who then taught me, how to make the perfect pie with her perfected fool-proof pie crust recipe. My grandma was a genius in the kitchen. Seriously, she was. Back in the days before pinterest and blogging, her recipes were featured in magazines and she was called by telephone on multiple occasions to speak on Melinda Lee’s radio cooking show. She won blue ribbons at county fairs for her creative recipes; her most famous was her avocado cream pie-back in the day before avocados in desserts was “a thing”.
I’m grateful for the cooking legacy that my grandma left behind, so in the spirit of Thanksgiving I am sharing her pie crust recipe with you today (and in the upcoming weeks I will share some of her amazing pie recipes)! This holiday season, you can wow your friends and family with a perfect crust.
This recipe makes 4-5 pie shells. I usually make 4 out of it, since I prefer a bit of a thicker crust and most of my pie dishes are an odd size (9.5″). Play around with it and see what works for you. The dough can refrigerate for up to a few weeks and can be frozen as well. It’s nice (especially during the holidays) to make the dough one time and then have it on hand for all of those upcoming parties.
Start with all of your ingredients. Just a note on the shortening: my grandma always used Crisco. Over the years, I’ve learned a lot about oils and especially hydrogenated and I’d rather not put that in my body. Not that all the sugar in desserts are great either, but I try to opt for the healthiest ingredients, even when making sweets. I found an organic palm/vegetable shortening on Amazon and that is what I use now in place of Crisco. I’m not going to tell you which to use, but I did link where to find it at the end of this post in case you are interested.


Okay, back to business. Making dough is pretty straightforward and easy to do and I will walk you through it. Start by mixing your first four ingredient in a large bowl with a fork or pastry cutter (flour, shortening, sugar and salt). In a separate bowl, mix your remaining ingredients together (egg, vinegar, water).

When the two are mixed well, add them together. At some point, you will need to use your hands to help mush the dough together and mold it into a ball.


Mold your dough into one big ball at first. Just knead it around the bowl; you don’t need to take it out. The dough is going to be very soft and moist. It isn’t dry like other recipes you may be used to using. If it becomes too sticky, you can add a little bit of flour to your hands. You are going to then chill it in the fridge for at least 15 minutes. It may help to cover your bowl with a towel or saran wrap, just so the dough doesn’t dry out.


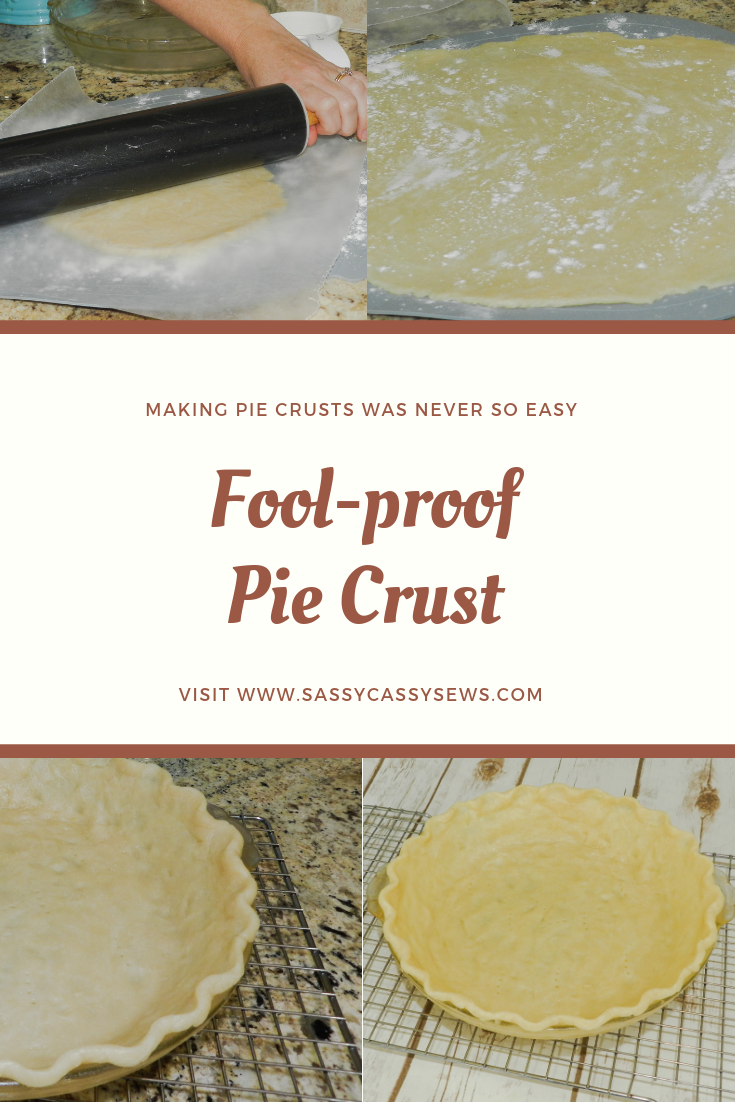
After the dough is chilled, you are ready to roll it out. You can use a pastry mat, or, if you don’t have a pastry mat, put down a piece of wax paper on your counter. Sprinkle flour on top of your mat before you put the dough down. This will help with sticking; you don’t want sticking, it will mess up your crust. Separate your dough into 4-5 dough balls. If you are doing smaller pies (8″-9″), five balls will be perfect. For slightly larger crusts (10″), go for four balls. Set all your dough balls aside except for the one you will be starting with.

Place your dough ball on your floured mat and press down slightly to flatten it. Sprinkle more flour on top of the crust to avoid sticking to your rolling pin. You can also put a sheet of wax paper on top which is what I like to do; the dough doesn’t stick to wax paper.

Now, roll out your dough! Roll it out until it is the size of your pie pan. When you are ready to transfer it into your greased pie dish, gently peel back the wax paper and fold the dough onto itself into quarters. This helps it to stay together during the transfer and not tear apart. I also like to sprinkle a little flour on top of the pie crust before I start folding, just to make sure it doesn’t stick.


Place your crust into the pie dish and pat down the middle and sides. Make the edges pretty by either taking a fork all the way around or by using your finger to create beautiful ripples (as shown in the picture).


Take your fork to poke a few holes in the bottom of your pie shell. This will help to let out any air pockets while baking. If you don’t do this, your pie shell might bubble up and warp! This is the point where you either prebake your pie shell, or fill it and bake; it depends on your pie recipe. I always put pie shields around the top to prevent the edges from burning. You can use foil to wrap the edges if you don’t have pie crust shields, but it is much less headache to use the shields! Bake with the shields on, removing them during the last 10-12 minutes of baking.


What you have now is a beautiful pie shell! Wasn’t that easy? Not only does it look great, but it is the most delicious pie crust! You are sure to get many compliments on your crust with this recipe!


*This post contains affiliate links.


- Mix your first 4 ingredients together with a fork (flour, shortening, sugar and salt).
- In a separate bowl, beat the remaining ingredients together.
- Combine the two mixtures, stirring with a fork until all ingredients are moistened.
- With your hands, mold the dough into a ball. Chill for at least 5 minutes (in the fridge) before rolling out your desired shape.
- Once chilled, split the dough into 4-5 separate dough balls, depending on the size pie shell you want.
- Roll out your pie shells with a rolling pin and place your shell into a 9-10" pie pan. With your fork, puncture several holes on the bottom crust in the pan, allowing air to escape while baking.
- For a prebaked shell, bake your crust at 400 degrees for about 20-25 minutes, or until the crust starts to turn a light brown. For all other pies, bake according to your pie recipe.
*For fruit filled pies, pour in your filling before baking. For other pies, such as custards, bake and then let the crust cool before filling.
**It's always a good idea to put pie shields (or foil) around the edges of your pie while baking. Uncover for the last 10-12 minutes of baking.
***You can refrigerate the dough balls for a few weeks, or stick in the freezer to use at a later time. Either way, make sure to wrap the dough well; I wrap in saran wrap and then place them into a Ziploc bag.