
Last month, while I was in Hawaii, I had a sub fill in for my sewing classes at the learning centers. I always try to pick easy projects that the students can make and take in a day. This way, the sub doesn’t have to stress out about collecting unfinished projects at the end of class and getting it all back to me after I return and before my next class. I prepare everything beforehand; cutting out the material, writing up directions, etc.
I threw a few ideas out to my students before I left, and one of those ideas was a fabric cord wrap that could easily wrap their sewing machine cords. So many cords end up in a jumbled mess in their sewing bags, and I’ve been thinking for a long time that I should take a day for them to make a wrap out of fabric that they can use on their cords. I almost changed my mind and had them make something else, thinking this might not be a project to excite them, but to my surprise, the kids were actually really excited to make these! So I decided to stick to the plan and prepare this assignment for the sub.
Why it took me so long to follow through with this, I don’t know, but it worked out to be a perfect assignment with the sub. The only problem was that it was a little too easy. They whipped them up super fast. Luckily, my sub was prepared and she had plenty of fabric scraps to keep them busy for the remainder of the class period.
You can make your fabric cord wrap any size you like. I’ve seen some sewn much smaller to be used for phone charging cords, but I made mine a little bigger so that it could wrap around their sewing machine cords. Feel free to make whatever size you like, but you’ll find the size for the sewing machine cords in the tutorial below!
Materials
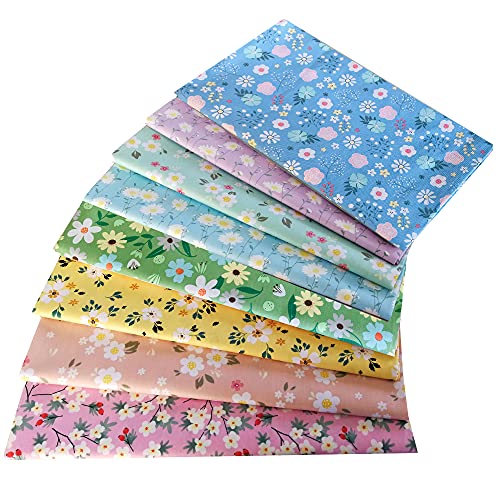
- Cotton fabric, cut into a 5” x 8” rectangle (scraps or fat quarters work great!)
- Lightweight fusible interfacing, cut into a 5” x 8” rectangle
- Velcro strip
Fat QuartersUltra Lightweight Fusible Interfacing0.75 Inch Width Hook and Loop with Strong Self Adhesive TapeSewing Clips


How To Sew Your Fabric Cord Wrap
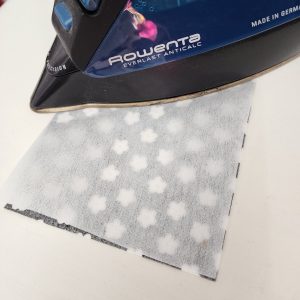
First, interface the wrong side of your cotton rectangle that you cut out. Remember that the bumpy side of the interfacing goes against the wrong side of the fabric.
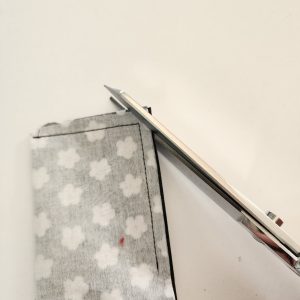
Fold your fabric in half lengthwise, pinning the top and side edges of the fabric. Stitch around the perimeter of the rectangle, leaving an opening on the side to turn the fabric.

Remember to clip your corners before turning. This helps reduce bulk and keep your corners nice and sharp!
Flip your cord wrap through the opening. Then, press your fabric and stitch the opening shut.

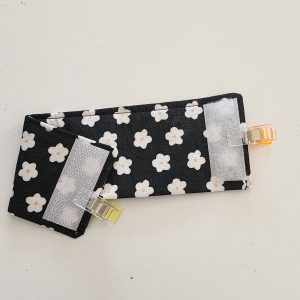
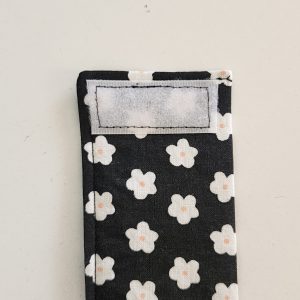
On one end of your cord wrap, clip a strip of Velcro and stitch around the perimeter of that Velcro piece. On the other end of the rectangle, sew your contrasting piece of Velcro on the back side. So, you will have a Velcro piece on each end of the rectangle, but on opposite sides of the fabric, make sense?
And that’s it!! Yes, really. That’s all there is to sewing a cord wrap. You probably didn’t even need a tutorial, did you??
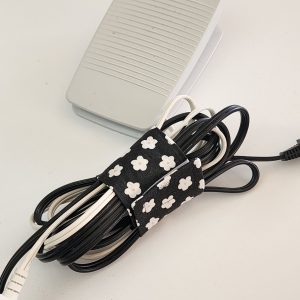
It’s suuuuper easy and quick to make a fabric cord wrap. You could easily whip yourself up a dozen of these in just an hour or two. You’ll never have tangled cords again!
*Sassy Cassy’s is part of the Amazon Affiliate Program, which means that if you purchase Amazon items from this website, a small commission will be earned, at no extra cost to you.
